
| 일 | 월 | 화 | 수 | 목 | 금 | 토 |
|---|---|---|---|---|---|---|
| 1 | 2 | 3 | 4 | 5 | 6 | 7 |
| 8 | 9 | 10 | 11 | 12 | 13 | 14 |
| 15 | 16 | 17 | 18 | 19 | 20 | 21 |
| 22 | 23 | 24 | 25 | 26 | 27 | 28 |
- Java & SpringBoot로 시작하는 웹 프로그래밍
- 부르지마세요
- 강아지 #박스집 #복층
- 바이트디그리
- #FIFAONLINE4
- 안드로이드#앱만들기#알바
- fifaonline4
- 패스트캠퍼스
- 부의감각
- 안녕 디지몬
- 랜덤스쿼드
- fifaonline
- 안드로이드 #앱개발#계산기
- 혼술 술자리 인싸앱
- 박스#강아지집#만들기
- 독서감상문
- 랜덤
- 스쿼드 메이커
- 안드로이드 그림판#그림메모장#낙서장
- 피온4
- 아두이노#작품#사료급식기
- K디지털크레딧
- 자바 인강
- 내일배움카드
- Ai
- 강아지 스마트 펜스
- 불끌때
- 안드로이드
- D-ID
- 홈CCTV
- Today
- Total
LC Studio
[Android] RXKotlin과 retrofit2를 사용하여 GPT chat API 구현하기 본문
[Android] RXKotlin과 retrofit2를 사용하여 GPT chat API 구현하기
Leopard Cat 2023. 10. 28. 15:271. OPENAI API 설명문서를 읽고 API 연동방법에 대해 알아본다. API Reference - OpenAI API
OpenAI Platform
Explore developer resources, tutorials, API docs, and dynamic examples to get the most out of OpenAI's platform.
platform.openai.com
대충 그렇구나~ 알아보고 다음으로 넘어가보자.
(회원가입하고 API key는 발급받아보세요)
2. Gradle에 implement
/* Retrofit2 */
implementation ("com.squareup.retrofit2:retrofit:2.3.0")
implementation ("com.squareup.retrofit2:adapter-rxjava2:2.3.0")
implementation ("com.squareup.retrofit2:converter-gson:2.3.0")
implementation ("com.squareup.okhttp3:logging-interceptor:3.9.0")

/* RxKotlin */
implementation ("io.reactivex.rxjava2:rxandroid:2.0.1")
implementation ("io.reactivex.rxjava2:rxkotlin:2.3.0")
3. manifiest에 internet 권한 설정
<uses-permission android:name="android.permission.INTERNET"/>4. client 폴더 생성 -> GPTClient class 생성
class GPTClient {
    companion object {
        private const val GPT_URL = "https://api.openai.com/v1/chat/" //GPT API url

        fun getGPTApi(): GithubService = Retrofit.Builder()
            .baseUrl(GPT_URL)
            .client(OkHttpClient())
            .addCallAdapterFactory(RxJava2CallAdapterFactory.create())
            .addConverterFactory(GsonConverterFactory.create())
            .build()
            .create(GithubService::class.java)
    }
}
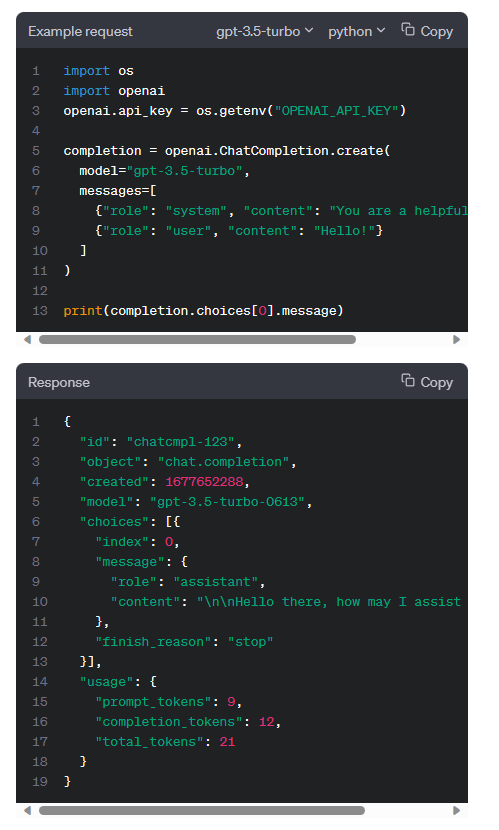
5. model 폴더 생성 -> GPTRepo data class 생성
data class GPTRepo(
    @SerializedName("id") val id: String,
    @SerializedName("object") val gptObject: String,
    @SerializedName("created") val created: Long,
    @SerializedName("model") val model: String,
    @SerializedName("choices") val choices: List<Choice>,
    @SerializedName("usage") val usage: Usage
)

data class Choice(
    @SerializedName("index") val index: Int,
    @SerializedName("message") val message: Message,
    @SerializedName("finish_reason") val finishReason: String
)

data class Message(
    @SerializedName("role") val role: String,
    @SerializedName("content") val content: String
)

data class Usage(
    @SerializedName("prompt_tokens") val promptTokens: Int,
    @SerializedName("completion_tokens") val completionTokens: Int,
    @SerializedName("total_tokens") val totalTokens: Int
)
위의 respone 양식에 맞춘 데이터 클래스를 생성!
6. service 폴더 생성 -> GPTService interface 생성
interface GPTService {
    @POST("completions")
    fun getGPTRepos(
        @Header("Content-Type") contentType: String,
        @Header("Authorization") authorization: String,
        @Body body: RequestBody
    ) : Single<GPTRepo>
}
헤더
@Header("Content-Type") 에는 "application/json" 가 들어가고,
@Header("Authorization") 에는 "Bearer $apiKey" 가 들어갈겁니다.
바디는 API 호출하는 부분에서 자세히 보시죠.
7. API 호출
@SuppressLint("CheckResult")
fun gptApi(message: String){
	//본인 apikey 입력, message에는 gpt에게 전달할 메시지 입력
    GPTClient.getGPTApi().getGPTRepos("application/json", "Bearer $apiKey", setApiInfo(message))
        .subscribeOn(Schedulers.io())
        .observeOn(AndroidSchedulers.mainThread())
        .subscribe ({ items ->
            println(items.choices[0].message.content)
        }, { e ->
            println(e.toString())
        })
}

private fun setApiInfo(message: String): RequestBody {
    //AI 컨셉
    val aiConcept = JSONObject()
    aiConcept.put("role", "system")
    aiConcept.put("content","You are helpful assistant")

    //user 메시지
    val userMsg = JSONObject()
    userMsg.put("role", "user")
    userMsg.put("content", message)

    //AI 컨셉, user 메시지 병합 하기
    val jsonObject = JSONArray()
    jsonObject.put(aiConcept)
    jsonObject.put(userMsg)

    //Body 생성
    val requestBody = JSONObject()
    requestBody.put("model", "gpt-3.5-turbo")
    requestBody.put("messages", jsonObject)

    return requestBody.toString().toRequestBody("application/json".toMediaTypeOrNull())
}
body에는
ai 컨셉, 메시지, 모델명이 들어갑니다.
activity, viewmodel 등 원하는 곳에서 호출하시면 됩니다!
끝!
참고 블로그 ↓
[Android] RxKotlin과 Retrofit2를 사용해 Github api 정보 가져오기 — 꾸준하게 (tistory.com)
[Android] RxKotlin과 Retrofit2를 사용해 Github api 정보 가져오기
RxKotlin과 Retrofit2를 사용하여 api 통신 하는 예제입니다. 예제에서는 Github에서 제공하는 api를 사용하여 사용자의 repository 정보들을 가져옵니다. 1. dependency 추가 Rxkotlin과 Retrofit2 의존성을 app 수준
leveloper.tistory.com
'프로젝트 > 아이톡 - AI 여자친구와 톡톡!' 카테고리의 다른 글
| [Android] Mp3 to Url 테스트 (0) | 2023.12.02 |
|---|---|
| [Android] 안드로이드 인앱 구독 결재 구현하기 (0) | 2023.11.19 |
| [아이톡 - AI 여자친구와 톡톡!] 앱 제작 후기 (1) | 2023.11.14 |
| [Android] Compose에서 Box 클릭효과 모양 변경하는 방법 (0) | 2023.10.15 |
| [Android] Compose에서 네비게이션바 색상 변경하는 방법 (2) | 2023.10.09 |
